Saturday 24 December 2011

Tool bars


Toolbars contain icons, which serve as shortcuts for many NX functions. The following figure shows the main Toolbar items normally displayed. However, you can find many more icons for different feature commands, based on the module selected and how the module is customized.


􀂾 Right-Click anywhere on the existing toolbars gives a list of
other Toolbars. You can add any of the toolbars by checking
them. 
The list of toolbars you can see in the default option is Standard, View, Visualization, Selection, Object Display, etc. Normally, the default setting should be sufficient for most operations but during certain operations, you might need additional toolbars. If you want to add buttons pertaining to the commands and toolbars, 


􀂾 Click on the pull-down arrow on any of the Toolbars and choose
ADD OR REMOVE BUTTONS.
􀂾 Choose CUSTOMIZE


This will pop up a Customize dialog window with all the Toolbars under ‘Toolbar’ Tab and commands pertaining to each Toolbar under ‘Commands’ tab. You can check all the toolbars that you wish to be displayed.


You can customize the settings of your NX interface by clicking on the Roles tab on the Resource Bar


The Roles tab has different settings of the toolbar menus that are displayed on the NX interface.


• It allows you to customize the toolbars you desire to be displayed in the Interface.
• Selecting Advanced shows all the Application Toolbars necessary for drafting and modeling.
• You can also select the Application Toolbars to be displayed in the Interface by clicking on the Industry Specific settings. This provides a list of industry
specific toolbar applications as shown below.


Wednesday 14 December 2011

Model a Hexagonal Nut


􀂾 Create a new file and save it as Impeller_hexa-nut
􀂾 Click the polygon icon from the toolbar


􀂾 Create a hexagon with each side measuring 0.28685 inches and constructed at the origin
􀂾 Extrude the hexagon by 0.125 inches
The figure of the model is shown below.


􀂾 Choose INSERT → DESIGN FEATURE → SPHERE
􀂾 Choose CENTER, DIAMETER

􀂾 Enter the diameter value 0.57 inches
􀂾 Enter the Point Constructor values as follows

Axes            XC      YC           ZC
Dimension   0.0      0.0       0.125

􀂾 In the Boolean operations dialog box select INTERSECT
The model will look like the following.


We will now use a Mirror command.
􀂾 Choose EDIT → TRANSFORM
􀂾 Select the model and click OK
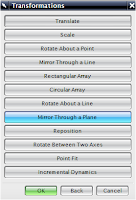
􀂾 Click MIRROR THROUGH A PLANE
􀂾 Click on the flat side of the model as shown. Be careful not to select any edges
Click on OK

􀂾 Click on COPY
􀂾 Click CANCEL


You will get the following model.
􀂾 Choose INSERT → COMBINE BODIES → UNITE
􀂾 Select the two halves and Unite them
􀂾 Insert a cylinder with the vector pointing in the Z-direction
and with the following dimensions.
Diameter = 0.25 inches
Height = 1 inch
􀂾 Center the cylinder on the origin and subtract this cylinder
from the hexagon nut
Now, we will chamfer the inside edges of the nut.
􀂾 Choose INSERT → DETAIL FEATURE → CHAMFER

􀂾 Select the two inner edges as shown and click OK
􀂾 Enter the Chamfer Offset Diameter as 0.0436 inches and click OK
You will see the chamfer on the nut. Save the model.


Wednesday 7 December 2011

Introduction to manufacturing


The models and drawings created by the designer have to undergo other processes to get to the finished product. This being the essence of CAD/CAM integration, the most widely and commonly used technique is to generate program codes for CNC machines to mill the part. This technological development reduces the amount of human intervention in creating CNC codes. This also facilitates the designers to create complex systems. The manufacturing module allows you to program and do some post-processing on drilling, milling, turning and wire-cut edm tool paths.


A few preparatory steps need to be performed on every CAD model before moving it into the CAM environment.Before getting started, it would be helpful if you can get into a CAM Express Role. To do this, go to the Roles menu on the Resource Bar and click on the INDUSTRY SPECIFIC tab. A dropdown
menu will pop up in which the CAM Express role can be seen as shown in the figure


Saturday 3 December 2011

Threading of a hexagonal bolt


Open the model with Hexagonal nut from my previous post:


http://unigraphicsbasicsnmaterial.blogspot.com/2011/12/model-hexagonal-screw.html

  • Choose INSERT → DESIGN FEATURE →THREAD
Here you will see the threading dialog box as shown below.


There are two main options in Threading: 
1)Symbolic and 2) Detailed.

  • Click on the DETAILED radio button
  • Keep the thread as RIGHT HANDED
  • Click on the bolt shaft, the long cylinder below


the hexagon head Once the shaft is selected, all the values will be displayed in the Thread dialog box. Keep all these default values.

  • Click OK

The hexagon bolt should now look like the following. Save the model.


Model a Hexagonal Screw


Create a new file and save it as Impeller_hexa-bolt

  • Choose INSERT → DESIGN FEATURE → CYLINDER
  • The cylinder should be pointing in the Z-direction with the center set at the origin and with the following dimensions:


Diameter = 0.25 inches
Height = 1.5 inches


Now create a small step cylinder on top of the existing cylinder.

  • The dimensions of this cylinder are,

Diameter = 0.387 inches
Height = 0.0156 inches 


  • On the Point Constructor window,click the Center icon at the top
  • Click on the top face of the existing

cylinder as shown in the following figure


Under the Boolean drop-down menu,
choose UNITE


The two cylinders should look like the figure shown below.


Save the model.
Next, we will create a hexagon for the head of the bolt.


  • Choose the icon from the Curves Toolbar as shown


  • On the Polygon window, type 6 for the number of sides


  • Click OK


There are three ways to draw the polygon.
• Inscribed Radius
• Side of Polygon
• Circumscribed Radius

  • Choose SIDE OF POLYGON


On the next window, enter the following dimensions.
Side = 0.246 inches
Orientation Angle = 0.00 degree

  • Click OK
  • On the Point Constructor window, again choose the Center icon
  • Click on the top face of the last cylinder drawn 

The polygon will be seen as shown below. 
If the model is not in wireframe, click on the Wireframe icon in the View Toolbar


Now we will extrude this polygon.

  • Choose INSERT → DESIGN FEATURE → EXTRUDE
  • Click on all six lines of the hexagon to choose the surface that is required to be extruded
  • Enter the End Distance as 0.1876 inches

The model looks like the following after extrusion


On top of the cylinder that has a diameter of 0.387 inches, insert another cylinder with the following dimensions.


Diameter = 0.387 inches
Height = 0.1875 inches


You will only be able to see this cylinder when the model is in wireframe since the cylinder is inside the hexagon head. The model will look like the following.


We will now use the feature operation Intersect.

  • Choose INSERT → DESIGN FEATURE → SPHERE
  • Choose DIAMETER, CENTER


  • Enter the value of the diameter as 0.55 inches and click OK
  • On the Point Constructor window, choose the Center icon
  • Select the bottom of the last cylinder drawn, which is inside the hexagon head and has a diameter of 0.387 inches and a height of 0.1875 inches as shown below

Click OK


This will give take you the next Dialog box which will ask you to choose the Boolean operation to be performed.


  • Choose INTERSECT


It will ask you to select the target solid


  • Choose the hexagonal head as shown 


  • Click CANCEL


This will give you the hexagonal bolt as shown below.


Check here how to add threading to the above bolt in the next post:


http://unigraphicsbasicsnmaterial.blogspot.com/2011/12/threading-of-hexagonal-bolt.html

Thursday 1 December 2011

Test yourself:4


1. In NX, Surfaces are termed as sheets. (T/F)
2. The Trim and Extend tool is used to trim or extend an open or closed surface. (T/F)
3. You can use the Until Selected and Until Next options from the End drop-down list of the Extrude dialog box to create a sheet. (T/F)
4. The default tolerance value for the creation of sheet by is 0.0254. (T/F)
5. The maximum number of sections that can be used to create a sheet using the Ruled tool from the Surface toolbar is ____________.
6. The ____________ tool is used to create a sheet from n number of guide curves and n number of section curves.
7. The ____________ tool is used to stitch individual surfaces into a single surface.
8. The ____________ tool is used to trim and extend a surface.
9. The ____________ tool is used to create a planar surface.
10. The ____________ tool is used to create a surface offset.


Answers :
1. T, 2. T, 3. F, 4. T, 5. Two, 6. Studio Surface, 7. Sew, 8. Trim and Extend, 9. Bounded Plane,
10. Offset Surface

Wednesday 30 November 2011

FEATURE OPERATIONS


Feature operations are performed on the basic form features to smooth corners, create tapers, and unite or subtract certain solids from other solids. Some of the feature operations are shown below.
Let us see the different types of feature operation commands in NX5 and the function of each command.


TYPES OF FEATURE OPERATIONS
The features operations used in NX include Edge blend, Face blend, Soft blend, Chamfer,Hollow, Instance, Sew, and Patch. Let us see some of the important commands in details. Unlike the NX3 version, some of the feature operations have been removed in NX5. For example, the Taper operation has been removed. In addition, changes have been made to the way a few
operations are performed. For example, the Trim Body operation no longer supports solid bodies as tools for trimming. Some of the feature operations such as Split Body cannot be accessed from the INSERT menu and have to be opened using the Toolbar.


Edge Blend
An Edge Blend is a radius blend that is tangent to the blended faces. This feature modifies a solid body by rounding selected edges. This command can be found under Insert → Design Feature. You can also do a face
blend.
Chamfer
The chamfer function operates very similarly to the blend function by adding or subtracting material relative to whether the edge is an outside chamfer or an inside chamfer. This command can also be found under the Insert → Design Feature menu.
You can preview the result of chamfering and if you are not happy with the result you can undo the operation.


Thread
Threads can only be created on cylindrical faces. The Thread function lets you create symbolic or detailed threads (on solid bodies) that are right or left handed, external or internal, parametric,and associative threads on  cylindrical faces such as holes, bosses, or cylinders. It also lets you select the method of creating the threads such as cut, rolled, milled or ground. You can create different types of threads such as metric, unified, acme and so on. To use this command, go to Insert → Design Feature
 Trim Body
A solid body can be trimmed by a sheet body or a datum plane. You can use the Trim Body function to trim a solid body with a sheet body and at the same
time retain parameters and associativty. To use this command, go to 
Insert → Trim
Split Body
A solid body can be split into two just like trimming it. It can be done by a plane or a sheet body. Click on the icon in the Form Feature Toolbar as shown to open the Split Body dialog box.


Instance
A Design feature or a detail feature can be made into dependent copies in the form of an array. It can be Rectangular or Circular array or just a Mirror. This particularly helpful feature saves plenty of time and modeling when you similar features for example threads of gear or holes on amounting plate, etc. This command can be found by going to Insert → Associative Copy →
Instance Feature.


Tuesday 29 November 2011

Boolean Operations


Boolean operations are:
• Unite
• Subtract
• Intersect
These options can be used when two or more solid bodies share the same model space in the part file. 
To use this command, go to Insert → Combine Bodies.
Consider two solids given. The block and the cylinder are next to each other as shown below. 


Unite:
The unite command adds the Tool body with the Target body. For the above example, the output will be as follows if Unite option is used.


Subtract:
When using the subtract option, the Tool body is subtracted from the Target body. The following would be the output if the rectangle is used as the Target and the cylinder as the Tool.


Intersect:
This command leaves the volume that is common to both the Target body and the Tool body.The output is shown below

Friday 25 November 2011

Editing a Hole Feature

After creating a hole, you may need to edit its parameters. The parameters that can be edited in NX include the diameters, depth, and the positioning values of the hole. To modify the parameters of a simple hole, double-click on it; the Edit Parameters dialog box will be displayed if the hole is created by the Pre-NX5 Hole tool, as shown in Figure 


Also, the parameters of the hole will be displayed on the model, as shown in Figure .

Note
In case, the hole is created by the Hole tool, the Hole dialog box will be redisplayed. In this dialog box, you can redefine the parameters of the hole.

Feature Dialog Button
To modify the parameters of the hole, choose the Feature Dialog button from the Edit Parameters dialog box; the Diameter, Depth, and Tip Angle edit boxes will be displayed. If the hole selected is a counterbore or a countersink hole, the counter related values will also be displayed. Enter the new values in the respective edit boxes and choose the OK button; the original options of the Edit Parameters dialog box will be restored. Choose the OK button from this dialog box; the changes made in the parameter values of the hole will be
reflected in the model. 
Reattach Button
To change the placement face of the hole, choose the Reattach button from the Edit Parameters dialog box; the Reattach dialog box will be displayed, as shown in Figure 

By default, the Specify Target Placement Face button is chosen from the Selection Steps area and you will be prompted to select the target face. Select a new placement face to reattach the hole. On doing so, the Redefine Positioning Dimensions button will be automatically chosen from the Selection Steps area of the Reattach dialog box. To retain the same positional values for the hole on the new placement face and create it, choose the OK button.
To specify new positional values for the hole, select the dimension to be modified; a dialog box will be displayed and it will be named based on the type of dimension used to place the hole. Also, you will be prompted to select the target object. Select an edge or datum to define the new reference for the dimension in the new placement face; you will be prompted to select the reference from the tool (hole). Select the bottom circular edge from the hole; the Select Arc Position dialog box will be displayed. To define the positional value between the selected edge/datum and the center point of the hole, choose the Arc Center button from the Select Arc Position dialog box. To define the positional value between the selected edge/ datum and any of the quadrant points of the hole, choose the End Point button. To define
the positional value between the selected edge/datum and the tangent point on the bottom edge of the hole, choose the Tangent Point button. After specifying the dimension, choosethe OK button from the Select Arc Position dialog box. Also, choose the OK button from the
Reattach dialog box; the changes will be reflected in the model.

Note
You can also delete the hole dimensions using the Reattach dialog box. To do so, choose the Delete Positioning Dimension button from the Reattach dialog box and then select the dimension to be deleted.

Related Posts Plugin for WordPress, Blogger...